

What is Meta Pay?
Meta Pay, formerly known as Facebook Pay, is a secure way to make payments on Facebook, Instagram, WhatsApp, and Messenger. You can buy products, send and donate money within these apps using the Meta Pay feature. You can also use this service to make purchases from participating online stores.
You can view your payment history and review your payment method for each of the mentioned apps via Meta Pay. If you’ve set up a Facebook Pay account in the past, you don’t need to worry about registering for Meta Pay as your details will still be saved.
Meta Pay is free to use. However, you may be charged fees for certain transactions if you use PayPal via Meta Pay. You might also be charged additional fees for using Meta Pay if you receive money for personal fundraisers or if you sell and promote items on Facebook.
Let’s have a look at how Meta Pay works and how you can set it up on any Facebook-owned app!
How does Meta Pay work?
Meta Pay is a digital wallet that saves your payment information. When you want to spend money on any of the Facebook-owned apps, you can use your previously saved card information without needing to re-enter it.
If you only provide one payment method, Meta Pay will automatically use it as default. However, by adding multiple payment methods, you can choose which one you want to use as your default across the various apps. You could add your debit card as the default payment method on your Facebook account and a prepaid card as your default method on Instagram, for example.
You can set up Meta Pay by logging into Facebook, Instagram, WhatsApp, or Messenger. Go to the Settings and Privacy section and navigate to the Payments settings. You can enter your chosen payment method and account information here, which can be used across all Facebook-owned apps.
Meta Pay accepts the following payment methods:
- Credit and debit card
- Prepaid card
- PayPal
- Shop Pay
Once you have added a payment method, you can use Meta Pay the next time you want to donate and send money or make a purchase on any of the previously mentioned apps. Meta Pay may be listed as an option on other online stores, although participating stores are limited.
Why use Meta Pay?
Meta Pay is a fast way to spend and donate money on Facebook-owned apps. As merchants aren’t charged an additional fee for offering Meta Pay, many other online stores are also offering the payment option.
Meta Pay encrypts all your payment information and never shares it with third parties without prior permission. If you notice an unauthorised charge on your Meta Pay, you can contact Meta via the Facebook, Instagram, WhatsApp, or Messenger apps. You can choose to raise your query via Live Chat or by emailing the given address.
There are several great reasons to use Meta Pay, as seen below:
- Card details are encrypted and secured
- Account information is stored separately from payment details
- No need to re-enter payment details for each purchase
- Accepted across multiple apps
- Can make purchases/send and donate money without leaving Facebook-owned app
- Supports multiple payment methods
How to set up Meta Pay on Facebook
You can set up Meta Pay via the Facebook app or website. The payment information you save can be used to make purchases or send money via any of the Meta apps. Below are the steps to adding payment methods to Meta Pay via the Facebook webpage.
Step One
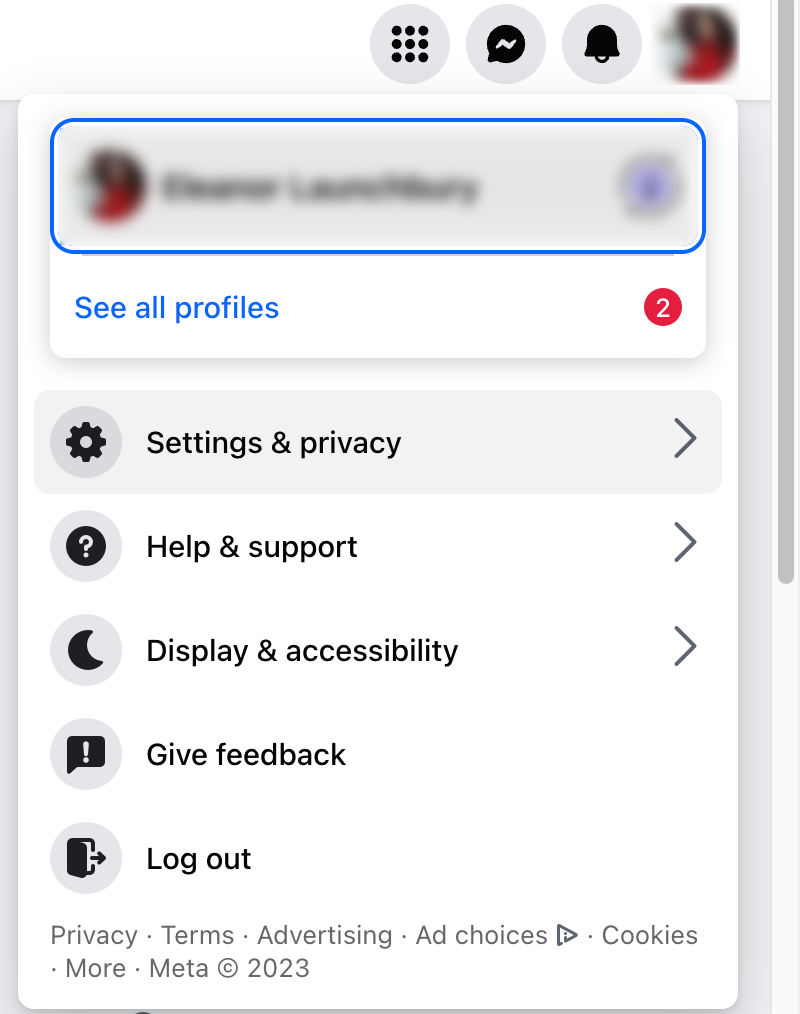
Click on your profile picture in the top right corner and select Settings and Privacy > Settings.
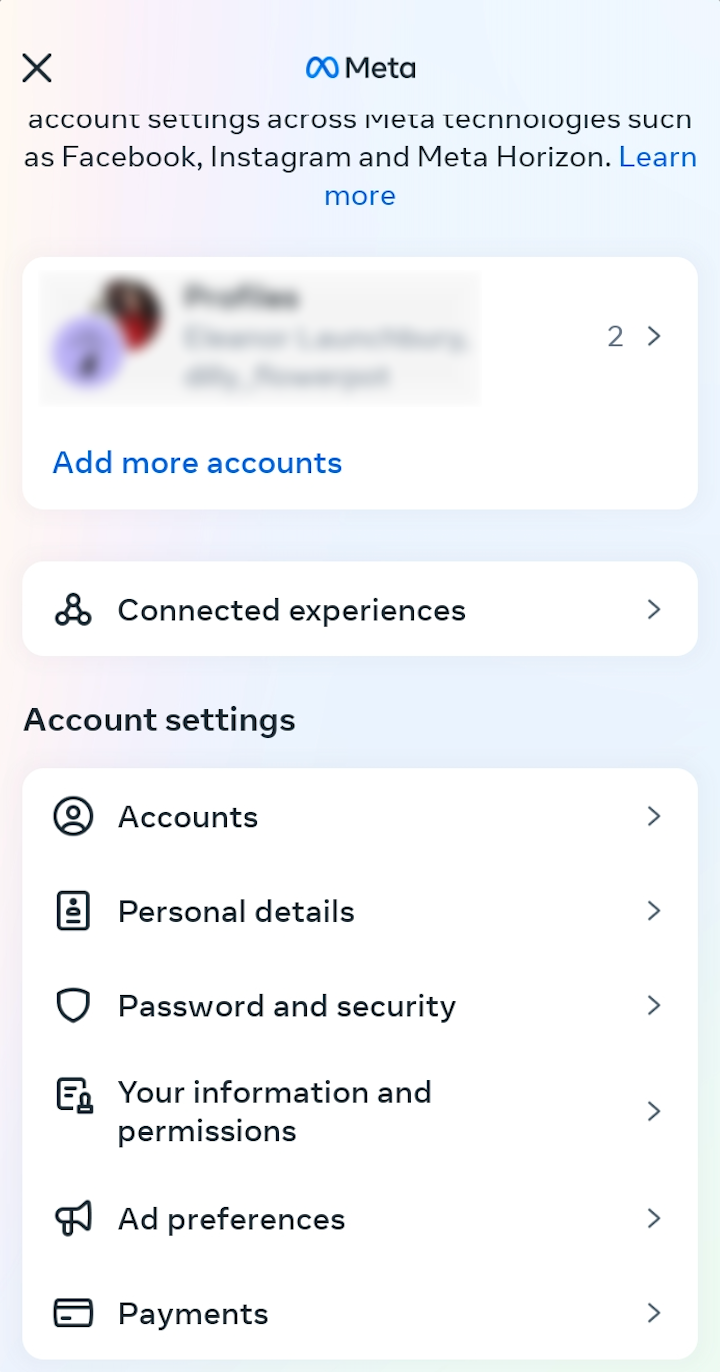
Step Two
The Accounts Center should appear in the top left of your screen. Click on Payments at the bottom of the options list.

Step Three
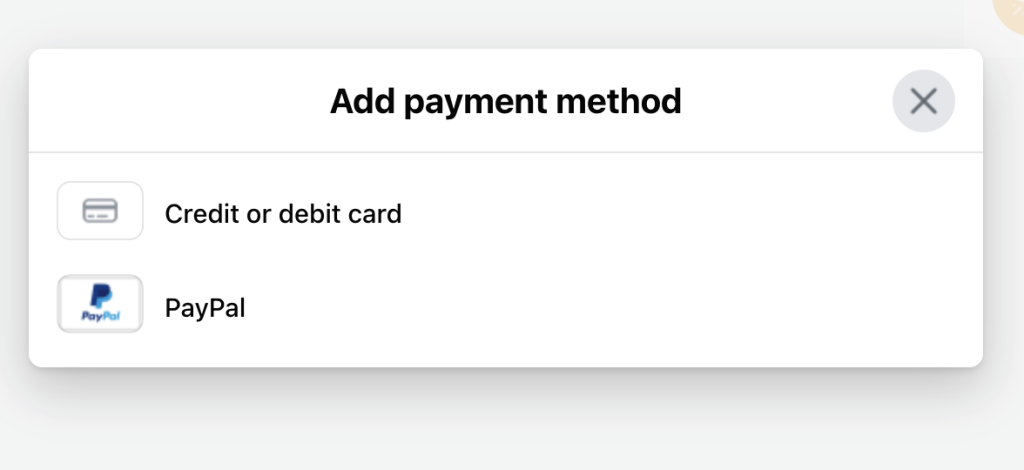
Select payments again from the list on the left of your screen. You will be given two options: ‘Ad Payments’ and ‘Meta Pay’. Click on Meta Pay and select Add Payment Method.

Step Four
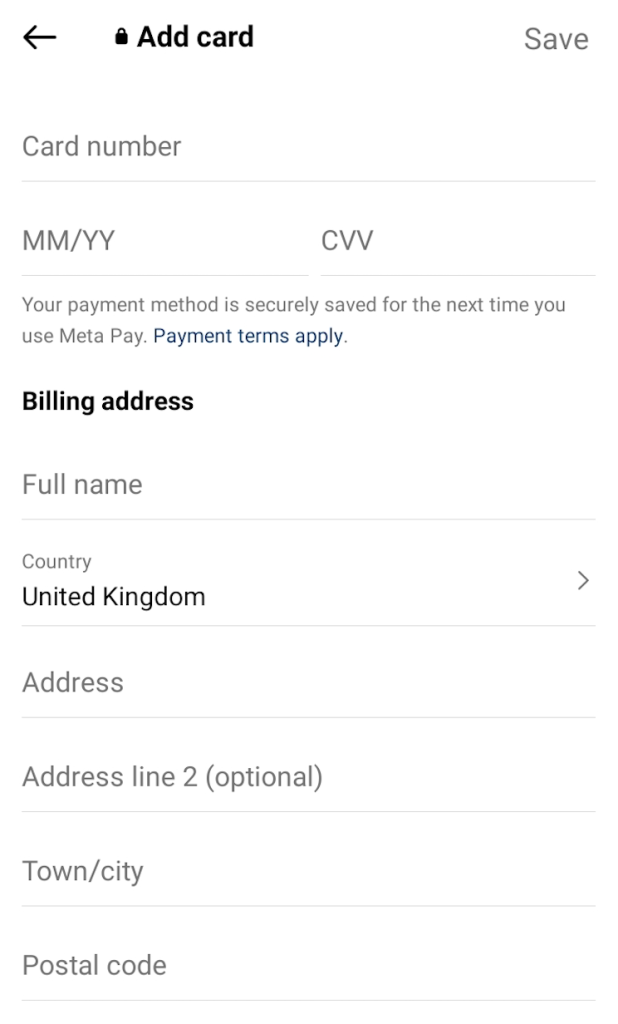
You can now add your preferred payment method. This could be a credit or debit card (including prepaid cards), or you could choose to link your PayPal account.
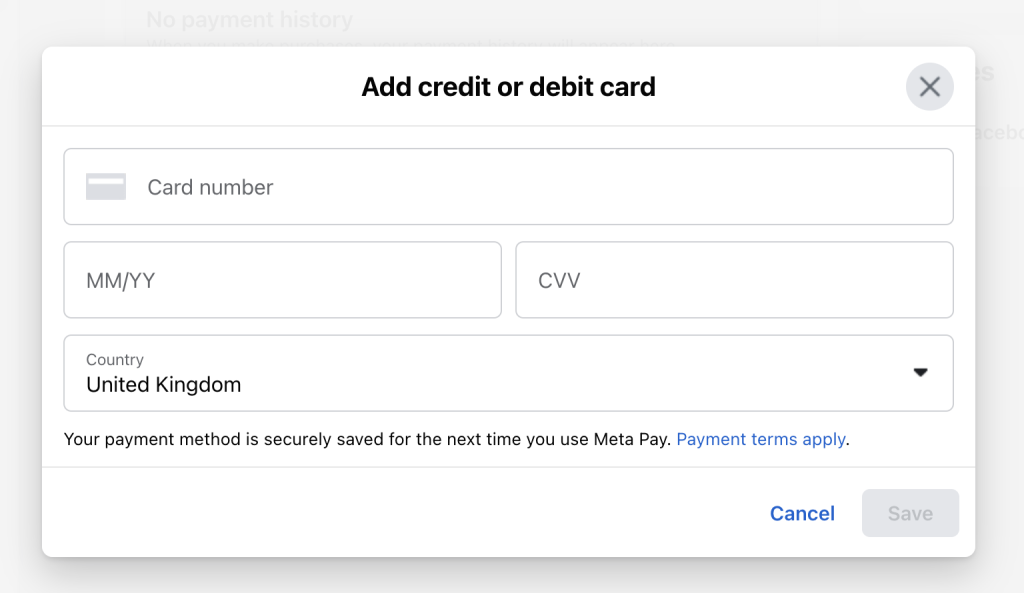
Step Five
Add your card details, including your card number, expiry date, and CVV. You will also have to select which country you are in from the drop-down list. Save the changes. You are now ready to use Meta Pay!
How to set up Meta Pay on Instagram
You can set up Meta Pay via your Instagram app or webpage. Below are the steps to adding payment methods to Meta Pay via the Instagram app.
Step One
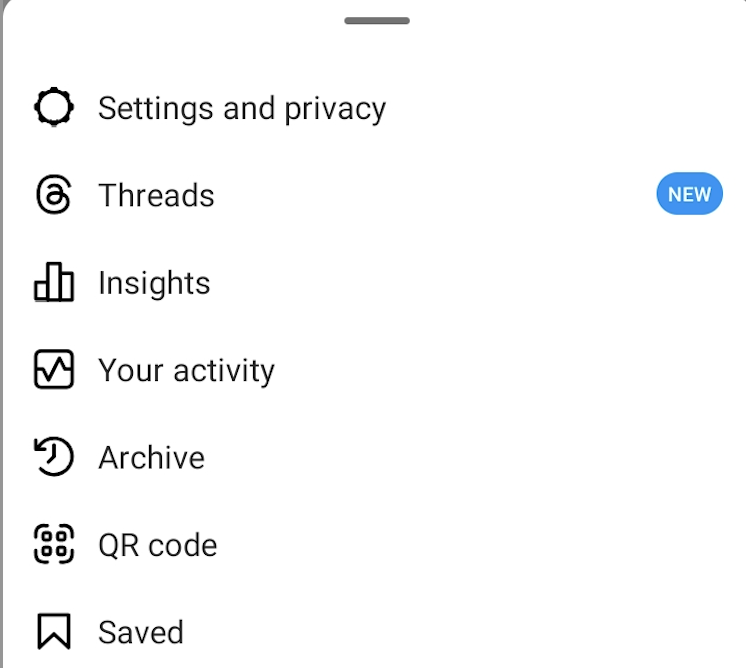
Go to your profile page and tap on the three lines in the top right corner. Select Settings and Privacy from the top of the list.
Step Two
Scroll down until you see Orders and Payments, and then tap Payment Methods.
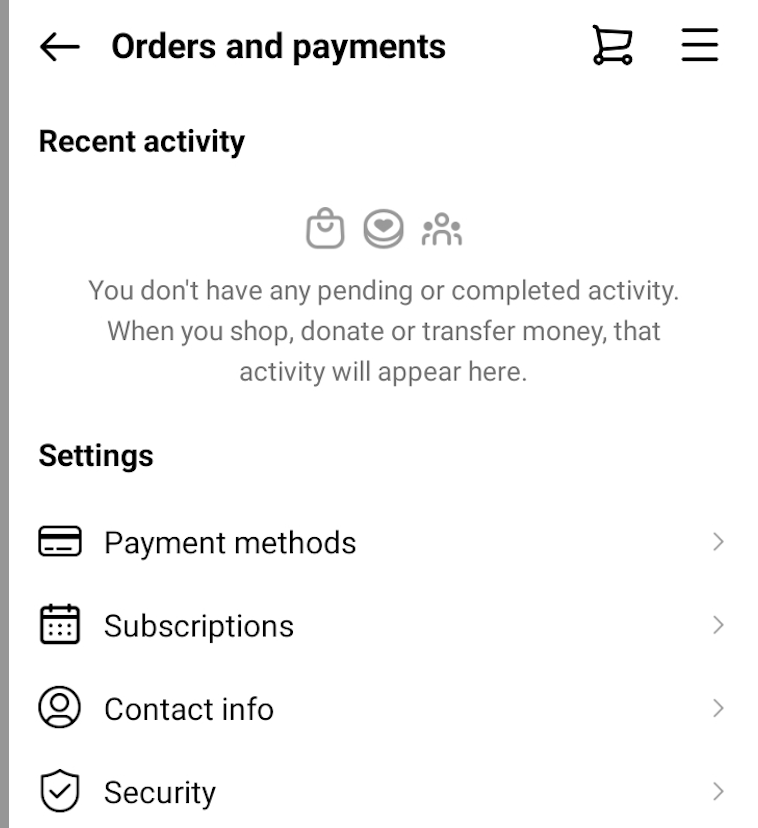
Step Three
Tap Add Payment Method.

Step Four
Choose whether you want to add a credit or debit card (or a prepaid card) or connect your PayPal account.

Step Five
If you’re adding a card, you’ll be asked for the card details and the billing address. Once you’ve added these details, tap Save in the top right corner. You’ve added a new payment method to your Meta Pay digital wallet!

How to set up Meta Pay on Messenger
You can set up Meta Pay via the Messenger app. Below are the steps to adding payment methods to Meta Pay via Messenger.
Step One
Tap on the three lines in the top left of your screen and select the Settings cog icon.
Step Two
Scroll down to the bottom until you reach the Meta Accounts Center. Tap on Payments.

Step Three
In the Meta Accounts Center, tap on Payments at the bottom of your screen. Then click on Meta Pay.
Step Four
You will be given the option to add a credit or debit card (or prepaid card) or link your PayPal account to Meta Pay.

Step Five
You will be asked to give your card information as well as the billing address. Once you have inputted the information, tap the Save button in the top right of your screen. You have successfully added a new payment method to Meta Pay!
Connect a prepaid card to Meta Pay
You can connect a prepaid card to Meta Pay in the same way you would a debit or credit card. When you choose Credit or Debit Card in the Add Payment Method section, add the prepaid card’s number, expiry date, and CVV. You’ll also need to add the billing address.
One of the great benefits of a prepaid card is that it isn’t directly linked to your bank account. This means the payments you make through Meta Pay won’t appear on your bank statement. It also means the funds in your bank account aren’t at risk if your Meta accounts (Facebook, Instagram, WhatsApp, or Messenger) are compromised.
You could choose to solely link your prepaid card to Meta Pay. The card will be automatically made your default payment method, so you don’t have to add your credit or debit card if you don’t want to. Alternatively, you could use your prepaid card for one app and another payment method for your other apps.
Our prepaid cards give you more control over your spending. You can only spend the funds on the card as it isn’t connected to an overdraft or bank account. There’s no way you can overspend, which can help you budget your online spending.
